Sarah shares her how to secrets...
How to Steps for Handcrafted Earrings
You will need:
1. Favorite jewels and or Charms
2. Stirling Silver Headpin
3. French Wire/Ear Wires
4. Round-nose Pliers
1. Favorite jewels and or Charms
2. Stirling Silver Headpin
3. French Wire/Ear Wires
4. Round-nose Pliers
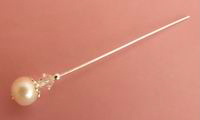
Step 1. Place spacer bead at the bottom of headpin, then add the beads of your choice on top. Experiment with different colors and styles. You can even add spacer beads to separate colors (swarovski crystals suggested).
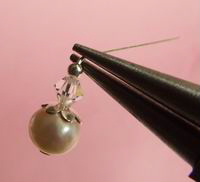
Step 2. Continue adding beads until you have 1/4 to 3/8 inches remaining to the headpin, or where the end of your drop earring is desired. Grip with rose-nose pliers as close to the top of the earring as possible.

Step 3. Bend around a pair of round-nose pliers forming a loop at the top of the headpin.
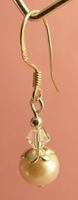
Step 4. Fish hook the French Wire/Ear Wire to complete your drop earring!
How to Steps for Handcrafted Noted Freshwater Pearl Necklace
You will need:
1. Freshwater pearls
2. Similar colored silk thread
3. Stirling silver classic fishhook clasp
4. Jewelry cord knotter tool
1. Freshwater pearls
2. Similar colored silk thread
3. Stirling silver classic fishhook clasp
4. Jewelry cord knotter tool
Step 1. Hand pick the variation of shapes and textures of the fresh water pearls that you want to use.
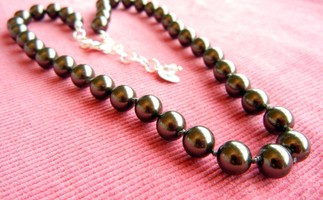
Step 2. First, using the cord knotter tool, fast a knot on either end of the first freshwater pearl closest to the end of your silk thread. Continue doing this on either side of every freshwater pearl until you have reached desired length of necklace.
Step 3. Attack bead tip to knot after last freshwater pearl. This clam shaped finding allows you to connect the thread to the metal finding of your fishhook clasp.
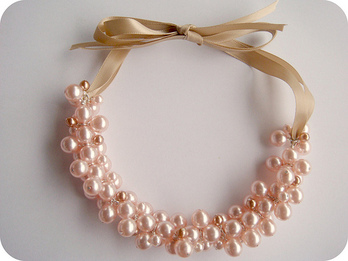
How to Steps for Pearl Cluster Necklace
You will need:
1. Freshwater pearls
2. Stirling silver wire
3. Desired ribbon color
4. Round-nose pliers
1. Freshwater pearls
2. Stirling silver wire
3. Desired ribbon color
4. Round-nose pliers
Step 1. Using the Headpins ... make wrapped loops of pearls and add them to a jump ring.
Step 2. Make Clusters of 5 pearls per jump ring, and continue to make 17 of these clusters.
Step 3. On a separate length of wire, secure one end with a wire wrapped loop. Then thread on a single pearl, followed by a cluster; Alternate and continue to thread all on to the wire, keeping 2 clusters to one side.
Step 4. Bunch together and you start to see the full bodied cluster shape forming. Once all beads are on, secure the other end of the wire also with a wrapped loop. Through the loops at each end, thread the ribbon to the halfway point.
Here is where the last 2 clusters come in, thread one over each ribbon at each end and place at the bottom close to the other pearls.
When worn, the ribbon is used to secure the necklace around the neck. Remember that matching bracelets can also be made using the same technique. For a different effect, try using glass beads, crystals or even a random mix of beads to give it a real charming and unique style.
